Inletting The Triggers:
Before the triggers can be inlet on a non-precarved stock, you need to determine where the triggers are going to be aligned with the lock. First place a mark on the face of the stock where the sear is located. Then you align the set screw of the triggers with the set screw. This ensures you have the cross over of the set trigger and the front trigger localized. Then I measure the depth of the wrist and which is 1-24/32" (Note, I measure everything in 32nds. My shop ruler is in 1/32" so this keeps things simple.) I use this measurement from the comb forward to the tail of the lock. At this point I want the front of the trigger plate to align with a line that is parallel to the stock edge along the barrel.
I identified the depth of the barrel and with a 1/32" hole drilled into the bottom flat of the barrel channel, I can use my special tool to measure the depth of the ramrod channel. I then transfer this to the outside of the stock. Now I know how much wood I can remove without jeopardizing the ramrod hole I drilled into the stock.


Then I added
1/16" of wood to the belly. This is the red line in the photo. I verified
to make sure I had 1/ 8"
of wood above the entry hole for the ramrod to inlet the rear thimble.
8"
of wood above the entry hole for the ramrod to inlet the rear thimble.


I figured since I had to shape the belly of the gun for the triggers, I went ahead and cut down the forearm along the ramrod channel to the proper depth and the wood in the wrist area. The photo on the left was before and the one on the right was cut down.
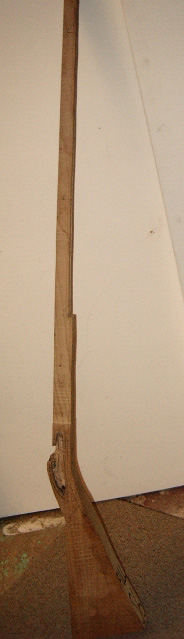
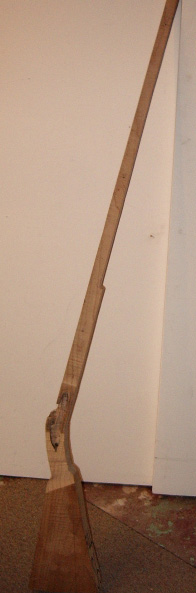
Now I can fit the triggers into position.
In order to better define the wrist area, I cut down the butt stock further.
 If
you closely, you can see the stripe peeking out at you.
If
you closely, you can see the stripe peeking out at you.
 Now
I ready to drill a hole in the bottom of the wrist to test the inletted lock for
any interference. Once I located the sear on the lock, I traced a line
onto the lock plate side of the stock. Next I drew lines over to a center line
down the wrist.
Now
I ready to drill a hole in the bottom of the wrist to test the inletted lock for
any interference. Once I located the sear on the lock, I traced a line
onto the lock plate side of the stock. Next I drew lines over to a center line
down the wrist.
 Then
a 1/8" hole is drilled along the center line and where the sear line cross
each other. Once drilled; now you are ready to test fire the lock. I use a
piece of hard wood as a fake flint in the hammer cock. I lower the frizzen. Then
I poke a 3/32" metal punch thru the hole. You should be touching the sear.
Press upon the sear and the lock will fire.
Then
a 1/8" hole is drilled along the center line and where the sear line cross
each other. Once drilled; now you are ready to test fire the lock. I use a
piece of hard wood as a fake flint in the hammer cock. I lower the frizzen. Then
I poke a 3/32" metal punch thru the hole. You should be touching the sear.
Press upon the sear and the lock will fire.
Here is a movie to illustrate this procedure. (Warning it is a big file = 2.89MB) MOVIE

Next I aligned the trigger plate without all the guts onto the stock along with the rough trigger guard. Note I had already cut off the tail of the trigger plate to fall short of the step in the butt of the rifle.
Since
I had shortened the tail, I decided not to mount the rear tail to the stock with a screw, but would rather have a short dovetail on the end of the trigger
plate so the tail locks itself into the stock. To make this, I wanted to accent
it by adding a small piece of brass to the end of the trigger plate. The brass
was silver soldered on and then shaped into a dovetail.
with a screw, but would rather have a short dovetail on the end of the trigger
plate so the tail locks itself into the stock. To make this, I wanted to accent
it by adding a small piece of brass to the end of the trigger plate. The brass
was silver soldered on and then shaped into a dovetail.

The lock plate was inlet into the stock and a reverse dove tail was chiseled
into the stock.
When the plate is laid down into the inletted recess, it will blend into the stock.

To start inletting the trigger plate
with components, I laid the plate in the stock and made a mark where the bolt
location was for the leaf spring in the set triggers. 
Then I removed the plate and laid the
spring into the recess to trace o ut
it's approximate location. Also removed enough wood for the bolt head to recess
into the stock, too.
ut
it's approximate location. Also removed enough wood for the bolt head to recess
into the stock, too.
Once this was done and the plate laid flush, I reassembled the trigger plate and then inlet the rest of the trigger plate assembly into the recess. Once the assembly was flush, I used a clamp to hold the front end of the trigger plate and tested the triggers. They worked fine.
Now I was ready for the tang bolt, to
"Button It Up". The location for the tang bolt was to be
centered in the barrel tang and then a hole was to be  drilled
thru the tang of the barrel and into the lower trigger plate. IMPORTANT! The
hole must be perpendicular to the surface of the tang. Since this was a .64
caliber rifle, I drilled and tapped the hole to receive a 10 X 32 tang
bolt.
drilled
thru the tang of the barrel and into the lower trigger plate. IMPORTANT! The
hole must be perpendicular to the surface of the tang. Since this was a .64
caliber rifle, I drilled and tapped the hole to receive a 10 X 32 tang
bolt.

With the bolt hole drilled and tapped, the next thing was to lower the wood surface around the lock to the correct depth. Generally I use my knife and cut a "V" notch or trench along the side of the lock. When done, the edge of the knife will align eventually to the edge of the lock to the depth I want. I remove the lock and then with cabinet files, I take the wood down until I can no longer see the "V" notch I trenched around the lock. Use a square periodically to check and make sure the surface is still square to the bottom or top of the stock and barrel.
Here is how it turned out.  Note,
I drew a line around the perimeter of the lock. This is the line I will remove
the wood in order to raise the lock panel from
Note,
I drew a line around the perimeter of the lock. This is the line I will remove
the wood in order to raise the lock panel from  the
stock and blend it into the stock. Using a 5/16" wide "U" carving
tool, I cut the wood away from the line. I is important to note, do not cut
straight down, but rather carve away at a slight slope away from the line. You
want the raised portion to appear to fade into the stock and not have a sharp
edge.
the
stock and blend it into the stock. Using a 5/16" wide "U" carving
tool, I cut the wood away from the line. I is important to note, do not cut
straight down, but rather carve away at a slight slope away from the line. You
want the raised portion to appear to fade into the stock and not have a sharp
edge.
Here is a movie with the lock; triggers and tang bolt in place. In the movie I demonstrate the operation of the set trigger and the front trigger separately.
Movie (Warning; 4 MB file)
Now I drew al
Next I proceeded to the Side Plate Panel section:
Hoot AL Rifle Shop
If you like the site or have any questions, drop me a line by clicking on "Hoot" below.

(c)
Copyright 2005. All Rights Reserved.