Shaping The Stock:
The barrel was inletted into the stock and then I drew the Lancaster rifle profile onto the butt of the stock. This will allow me the profile I need to inlet the barrel tang into the stock.
 To narrow the forearm o
 f
the stock, I used an 1/8" drill bit as an aid along the side of the swamped
barrel.
f
the stock, I used an 1/8" drill bit as an aid along the side of the swamped
barrel.
 This
gave me nice even smooth lines on either side of the barrel.
This
gave me nice even smooth lines on either side of the barrel.

In the lock panel area, I measured the width of the lock bolster. I then positioned the lock in the approximate location on the side of the stock, based upon where the breech plug end is in the end of the barrel. I will be putting the drum at the edge of the breech plug. A mark was made on the stock where the front of the lock was. Then added two more inches in front of this mark to be my transition area for the lock panel to the forearm. I did the same for the side plate side.
After the lines were drawn, I cut the stock down to profile the stock.


So far, the barrel has been inlet into the stock, pattern laid out on the stock and the excess wood has been removed. Next I will inlet the breechplug and then create the ramrod channel.
With the lock inletted, I can use
my Golden Means dividers to lay out the approximate location of the cheek piece
on the butt of the stock. 

First I open up the 5ths side of the dividers and span the length of the lock plate.
Then I flip the dividers to the 3rds end and from the front of the lock opening I locate the first mark.
 Now
I rotate the dividers and with the 3rds make a mark the same distance from the
center of the lock where the mark is. This will leave a
Now
I rotate the dividers and with the 3rds make a mark the same distance from the
center of the lock where the mark is. This will leave a mark outside the lock area on the wrist. This would be the mark that is used
later for locating the patchbox hinge on the right side .
mark outside the lock area on the wrist. This would be the mark that is used
later for locating the patchbox hinge on the right side .
Transfer this mark across the top
to the other side of the stock. 
Now draw a line from the top of
the wrist down on the left side of the stock. 
Now with the dividers, spread the
5th side of the dividers from this line on the left side across the butt of the
stock to the outer edge of the buttplate. 
Flip the dividers and coming from
the buttplate 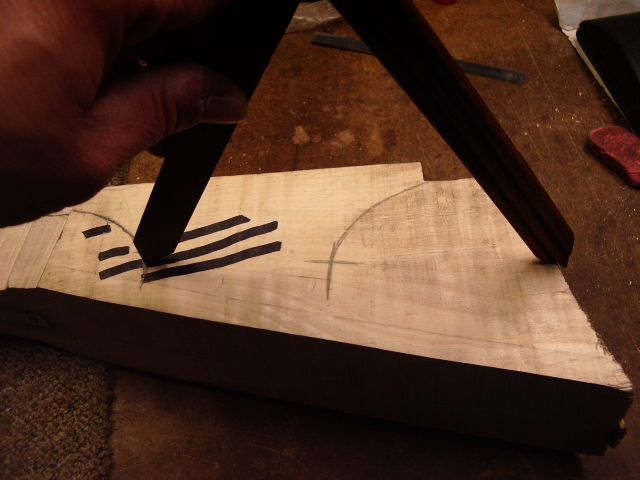 end,
use the 3rds end of the dividers to determine where the front of the cheekpiece
is.
end,
use the 3rds end of the dividers to determine where the front of the cheekpiece
is.
Now with the mark made, you use
the 3rds end of the dividers and go from the mark on the wrist to the front of
the cheekpiece. 
Flip the dividers and now you can
mark the rear end of the cheekpiece. 
Having done this, you now have the front and the end of the cheekpiece laid out. Note, this is how J.P. Beck laid out his rifle, which is the one I'm emulating. Other makers used different steps. The rear mark of the cheekpiece will curve up to the inside corner of the buttplate.
 Here is top view of the stock.
The rest are a series of
photos taken as the stock was cut down and shaped. Hope they help. 


In the process, took the
height of the cheekpiece down from 3/4" to 3/8" in the last photo
above.


Now for the other side of
the stock. 
 Divide
the side into 3rds and then file to meet the lines.
Divide
the side into 3rds and then file to meet the lines. 
 Work on the wrist by dividing into 3rds, 5ths and
 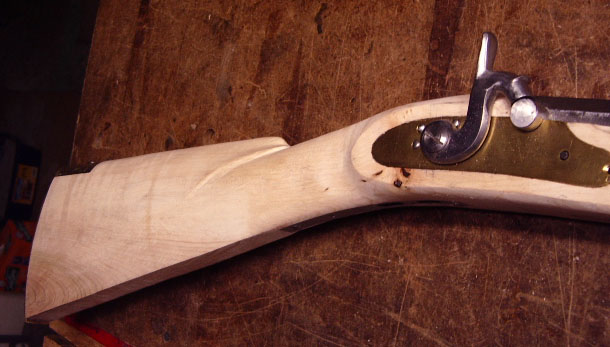 then
7ths. Also, you need to slop the sides around the lock panel, too. You
want to round this area allowing everything to blend together.
then
7ths. Also, you need to slop the sides around the lock panel, too. You
want to round this area allowing everything to blend together.
With the lock panel defined, you can now move onto the side plate panel.
Started shaping the
forearm by dividing the belly into 5ths (want a flatter belly) and the side into
3rds. 

Then I removed wood from the first section on either side of the stock.
With my files, I then
rolled over the wood toward each line until the line disappeared. As a result,
the belly was rounded over as 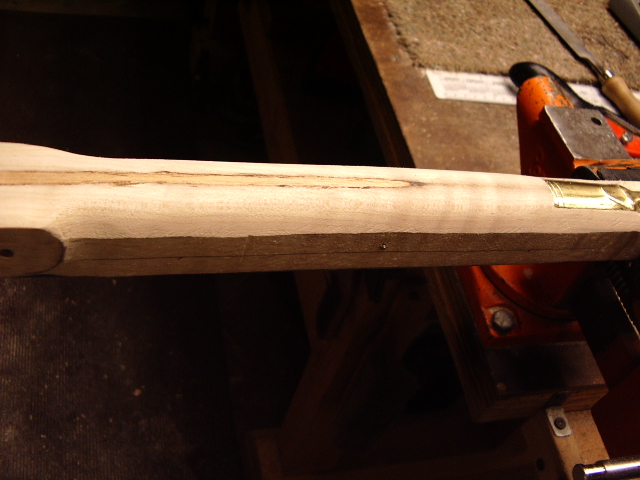 shown
here in the photo. Here you can see the exposure I have of the glued
in dowel I will be covering later with the forearm inlay.
shown
here in the photo. Here you can see the exposure I have of the glued
in dowel I will be covering later with the forearm inlay.
I continued shaping down the length of the forearm by dividing the sides into 3rds, 5ths and then 7ths. I wanted a rounded forearm leading to the nose cap. See Nose Cap: section.
If you like the site or have any questions, drop me a line by clicking on "Hoot" below

(c) Copyright 2005. All Rights Reserved.