Inletting The Trigger Guard:
 Took
the roughly cast trigger guard and cleaned it up a little.
Took
the roughly cast trigger guard and cleaned it up a little. 
Since the fore-end of the trigger guard extends up past the end of the ramrod, I selected to mount the trigger guard to the trigger plate. This way, the tang bolt that holds the trigger plate in place, can also secure the front end of the trigger guard, too.
To do this, I located exactly where the trigger guard will be positioned in relationship to the trigger plate. (Note: I moved the trigger plate toward the lock to make is easier operate the lock. Thus it is off center.)
I also noted the location 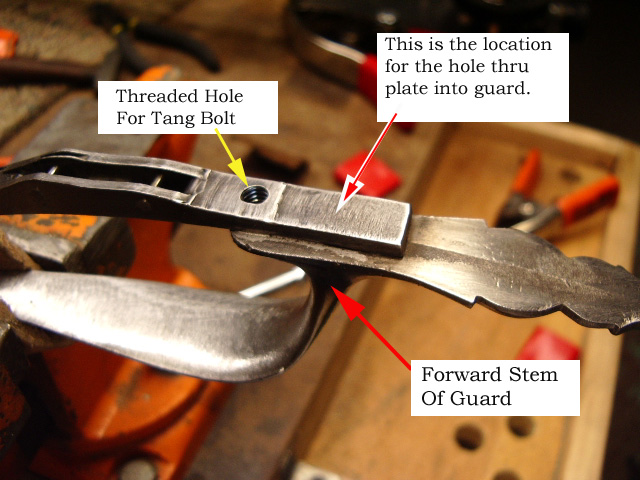 of
the stem on the trigger guard. This is the area I want to drill my mounting
screw hole down into the trigger guard, so I can mount the trigger plate to the
guard. Once I've done that, I soldered the two pieces of metal together.
of
the stem on the trigger guard. This is the area I want to drill my mounting
screw hole down into the trigger guard, so I can mount the trigger plate to the
guard. Once I've done that, I soldered the two pieces of metal together.
 With
the two pieces soldered together, I then decided on using a 6 x 32 screw;
determined depth to be 12/32" deep (plate + depth into stem) and drilled
the hole with a #36 drill bit.
With
the two pieces soldered together, I then decided on using a 6 x 32 screw;
determined depth to be 12/32" deep (plate + depth into stem) and drilled
the hole with a #36 drill bit.
Now with the hole drilled, I removed heated and removed the trigger plate from the trigger guard. Then I drilled a passage hole thru the trigger plate for the screw and coned the hole for the screw head. The trigger guard was placed level into a vise and then the hole was tapped with a 6 x 32 tap and finished with a bottoming tap of the same size. The screw was shorted to the depth of the hole and then the two pieces were screwed together.

Here is another view of the whole assembly. 
Now the front end of the trigger guard is
inlet into the forearm of the stock. Also you need to make adjustments to the
make sure  the
tang bolt is fully recessed into the bottom of the trigger guard. Trial and
error works great here. (I use candle black on the end of the bolt prior to
driving it into the trigger plate to see of it makes contact with the trigger
guard.)
the
tang bolt is fully recessed into the bottom of the trigger guard. Trial and
error works great here. (I use candle black on the end of the bolt prior to
driving it into the trigger plate to see of it makes contact with the trigger
guard.)
With the front end of the guard in place, I
now look at the rear position of the guard. I know the rear end of the trigger plate is slightly off
the center line of the stock. Knowing this I can position the rear end of the
guard onto the centerline on the stock.
position of the guard. I know the rear end of the trigger plate is slightly off
the center line of the stock. Knowing this I can position the rear end of the
guard onto the centerline on the stock.
Once located, I drill a 1/16" hole into the guard on my drill press. Remount the guard and clamp the guard into position. Then I drill a 1/16" hole thru the pilot hole in the guard into the the stock. Remove the guard and make a passage hole thru the guard for the screw and coned the hole for the screw head. With the guard mounted to the stock, I inlet the rear portion of the guard into the stock.
 Now the guard is fully inlet into the stock.
To remove the guard, first remove
the rear wood screw, then the tang bolt. Next lift the fore-end of the trigger guard (This disengages the
rear bevel on the trigger plate. Photo A) Then lift and pull the guard
forward. (This removes the trigger plate from the stock. Photo B)
the tang bolt. Next lift the fore-end of the trigger guard (This disengages the
rear bevel on the trigger plate. Photo A) Then lift and pull the guard
forward. (This removes the trigger plate from the stock. Photo B)
 Here
the guard is removed and laying beside the inletted areas.
Here
the guard is removed and laying beside the inletted areas.
 Here is a side view of the rifle with the guard.
With the trigger guard now installed, I'll install the Wooden Patchbox Lid.
Hoot AL Rifle Shop
If you like the site or have any questions, drop me a line by clicking on "Hoot" below.

(c)
Copyright 2005. All Rights Reserved.